Have you ever found yourself in this situation-you put serious thought into choosing what's marketed as "waterproof and moisture-proof" SPC flooring, yet less than a year after installation, tiny black spots start appearing along the wall edges and joints, accompanied by a musty, damp smell? To be honest, I receive calls like this almost every month.
I'm Sophia Brown, and I handle overseas business for SPC flooring at Haining Longtime Industry Co., Ltd. Over the past decade, I've been on construction sites, spent time in warehouses, and personally taken apart countless "problematic floorboards" sent back by customers. The more I've seen, the clearer one thing becomes: SPC flooring itself is indeed not afraid of water, but "waterproof" absolutely does not mean "mold-proof." Today, I want to share the real experiences and hard-earned lessons I've accumulated over the years-covering everything from prevention to remediation-so you can avoid the same pitfalls.
I. Is SPC Flooring Really "Waterproof"? Let's Clear Up This Misconception First
Many customers ask me, "Sophia, isn't SPC flooring waterproof? Then why does it still get moldy?"
This question hits the nail on the head. The core raw materials of SPC flooring are stone powder and PVC, which are inherently non-absorbent, resistant to water soaking, and don't swell or mold. High-quality SPC flooring can have a water absorption rate as low as less than 0.05%, remaining virtually unchanged even after 24 hours of water exposure. From a material standpoint, SPC flooring truly is not afraid of water.
But here's the catch: the flooring isn't afraid of water, but what's underneath the flooring certainly is.
Mold growth requires three conditions: moisture, stagnant air, and organic matter. SPC flooring itself contains no organic material to feed mold, but the cement subfloor underneath, wooden joists, and low-quality underlayment pads-these are all "delicacies" for mold. When moisture rises from the ground and gets trapped between the floor and the subfloor, mold will quietly thrive in those spaces.
II. Real-World Case Studies: A Lesson I'll Never Forget
Last summer, I received a distress call from a client in Guangdong. He had installed SPC flooring in his new home, and within less than six months, a musty smell began to emanate from the corner of the living room, and black mold spots even appeared near the baseboards.
Our team went to the site and pulled up the flooring-only to find the moisture barrier and the cement subfloor were covered in mold. Upon inquiry, we learned that the installer had cut corners, laying the floor directly without testing the subfloor's moisture content and failing to seal the seams of the moisture barrier with tape.
The client was frustrated: "I bought premium flooring from your company-how could this happen?"
I told him: The flooring itself is not the problem. The issue lies in the moisture protection during installation.
This case reinforced my conviction: no matter how good the SPC flooring is, if the subfloor moisture protection isn't done right, problems will still occur. Our company later compiled a dedicated SPC Flooring Moisture-Proof Installation Guide, which we now require every partnering installer to strictly follow.
Another case comes from an old first-floor house in Taipei's Da'an District. The homeowner had installed traditional PVC flooring last year. After just one rainy season, the joints in the living room visibly curled up, and mold spots appeared in the corners. Upon removal, we found that the adhesive layer underneath had failed due to moisture. We recommended switching to SPC flooring with a strict moisture-control installation process-subfloor leveling, moisture barrier installation, expansion gaps reservation, and sealing all wall edge gaps-and to this day, over a year later, the floor remains in perfect condition.
III. Preventing SPC Flooring Mold: The Installation Phase Is Critical
Based on our years of industry experience and customer service cases, 80% of the work to prevent mold on SPC flooring must be done during installation. Here are our professional recommendations:
1. Before Installation: Subfloor Moisture Content Must Meet Standards
The cement subfloor must be completely dry, with a moisture content controlled at 3%–5% or below. For damp subfloors, an epoxy moisture-proof primer or waterproof floor paint should be applied first. We strongly recommend using a professional moisture meter for testing rather than relying on gut feeling.
2. Moisture Barrier: Choose Right, Lay Right, Seal Right
- Material Selection: We recommend using an IXPE foam underlayment with a film coating, at least 2mm thick, ideally with a double-sided PE moisture barrier for better performance.
- Laying: Align the sheets evenly without overlapping, and seal the joints with waterproof adhesive tape.
- Allowance: Leave a 5cm allowance along the walls on all sides.
- First Floor or Basement: We recommend adding an additional 0.6mm thick agricultural film beneath the moisture barrier for double protection.
3. Locking Joints: Apply Mold-Proof Waterproof Sealant
Many people assume that because SPC flooring uses a click-lock installation system, no additional joint treatment is needed-this is a major misconception. Applying mold-proof waterproof sealant to all locking joints effectively prevents moisture from seeping downward.
4. Expansion Gaps: Leave Sufficient Room in Humid Environments
Leave 10–12mm expansion gaps along the walls. In humid regions, these gaps should be wider than in dry climates. Never seal the expansion gaps completely-they are essential for moisture protection and preventing deformation.
5. Edge Trim: Choose the Right Materials
Avoid wooden baseboards for edge finishing; instead, use stone-plastic or aluminum alloy baseboards, paired with mold-proof neutral silicone sealant to seal the gaps. Wall edges and pipe openings must be sealed with mold-proof glass sealant.
IV. Daily Maintenance: Don't Let Good Flooring Be Ruined by Small Oversights
Even with proper installation, daily maintenance cannot be overlooked:
1. Control Indoor Humidity
Maintain indoor humidity between 30%–50% for optimal conditions. During the rainy season, use a dehumidifier to keep humidity at 50%–60%. For dark, poorly ventilated spaces, install exhaust fans and schedule daily dehumidification and ventilation.
2. Clean Correctly
When using a damp cloth or mop, avoid using excessive water to prevent moisture from seeping into the joints and edges. Use a slightly damp flat mop with a neutral cleaning agent. Never rinse the floor directly with water.
3. Address Liquid Spills Promptly
Although SPC flooring is waterproof, spills should still be wiped up immediately to prevent water from penetrating to the subfloor and causing long-term mold and odor issues.
4. Place Doormats at Entrances
Use non-rubber doormats at entry points to effectively absorb dirt and moisture from shoes.
5. Regular Inspections
Before and after the rainy season, regularly inspect the floor joints and wall edges to catch potential issues early.
V. What If Mold Has Already Appeared? How to Remediate
Prevention is always the best approach, but if mold has already appeared in your home or project, don't panic. Follow these scientific steps to maximize the chances of salvaging your floor and preventing further spread.
Step 1: Identify the Location and Severity of the Mold
- Surface Spots: Typically appear as black, green, or gray spots only on the wear layer, with no visible bulging or penetration when touched. This is usually caused by excessive environmental humidity or standing water that wasn't wiped up in time. Remediation is relatively simple.
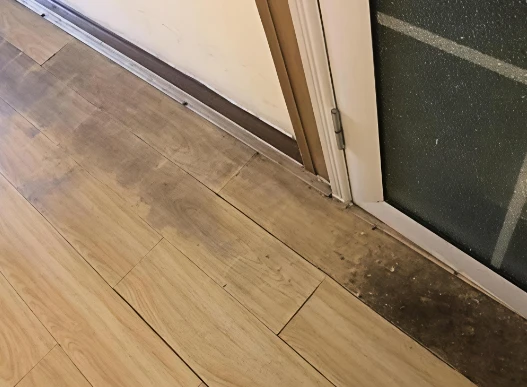
- Joint or Edge Discoloration: Mold growing along the locking joints or water marks/discoloration near baseboards indicate that moisture has already penetrated the connections.
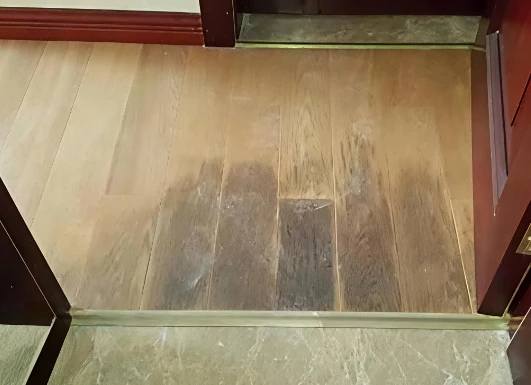
- Floor Blackening, Cupping, or Strong Odor: This usually signals a complete failure of the subfloor moisture barrier, with widespread mold growth underneath that requires full renovation.
Step 2: Safe Cleaning Method for Surface Spots
For surface spots only, follow these steps:
- Put on gloves and a mask, and open windows for ventilation to avoid inhaling mold spores.
- Prepare a basin of warm water and add diluted household bleach (1 part bleach : 10 parts water) or use a specialized SPC floor mold cleaner. Important: Do not use strong acids, strong alkalis, or abrasive cleaners (such as scouring powder or steel wool), as these will damage the wear layer and UV coating of your SPC flooring.
- Use a soft cloth or sponge dipped in the cleaning solution to gently wipe the moldy areas. Do not scrub aggressively.
- Wait 5–10 minutes for the solution to break down the mold, then wipe away any residue with a clean damp cloth, and finally dry the surface thoroughly with a dry cloth.
- Keep the area ventilated and dry for at least 24 hours. You may use a fan or dehumidifier to speed up the drying process.
Important Note: If the mold covers a large area or is deeply pigmented, you may repeat the process. However, do not allow liquid to sit on the floor surface for extended periods, as it may seep through the joints.
Step 3: Treating Joint or Edge Mold
If mold appears at the locking joints or near wall edges, surface cleaning alone won't solve the problem, as mold may have already penetrated the gaps. We recommend:
- Use a vacuum cleaner with a narrow nozzle attachment to remove dust and mold spores from the gaps.
- Use a cotton swab or small brush dipped in diluted bleach to carefully apply it to the moldy seams, being cautious not to let excess liquid overflow.
- Once dry, re-seal the gap with mold-proof neutral silicone sealant to block future moisture ingress.
- If the baseboards have been corroded by mold, replace them with stone-plastic or aluminum alloy baseboards.
Step 4: Severe Subfloor Mold-Full Removal Required
If the floor shows visible blackening, cupping, squeaking underfoot, or a pungent musty smell, the underlying problem is severe, and surface treatments will no longer help. The correct remediation process is:
- Completely remove the affected floor panels, carefully prying them up while keeping the locking mechanisms intact for potential reinstallation.
- Thoroughly inspect the moisture barrier and subfloor. Remove all moldy underlayment and any decayed wooden joists (if present).
- Treat the cement subfloor for mold: Scrub the subfloor with a professional mold remover or a high-concentration bleach solution (1:3), then allow it to dry completely (using dehumidifiers and fans to speed up the process). After drying, re-test the subfloor moisture content to ensure it drops below 3%.
- Apply a moisture-proof sealing primer to the subfloor (such as epoxy resin primer) to create a new moisture barrier.
- Reinstall a new moisture barrier (preferably a thicker version with all seams properly sealed), and then lay the original or new floorboards back according to standard specifications.
- If the original locking mechanisms are damaged, replace them with new planks, as compromised locks reduce sealing integrity.
Special Reminder: Large-scale subfloor mold remediation is a complex process. We recommend hiring a professional installation team. Our company provides after-sales technical support to our customers. If you encounter this situation, feel free to reach out to me and my team-we can remotely assess the issue and provide specific guidance.
Step 5: Monitor Continuously After Treatment
Regardless of the remediation level, monitor the treated area for at least one week after completion, keeping the environment well-ventilated and dry. If mold reappears, the source of moisture has not been resolved, and you will need to re-inspect plumbing, external wall leaks, groundwater levels, or other underlying issues.
VI. Longtime Industry's Commitment
As a professional enterprise dedicated to the R&D and production of SPC flooring, Haining Longtime Industry Co., Ltd always prioritizes product quality and customer experience. Our SPC flooring products feature high-density stone-plastic substrates with water absorption rates far below national standards, and are equipped with antibacterial and mold-resistant surface treatments.
But as I often tell my customers: Good flooring + Good installation = Good experience. No matter how excellent the flooring is, improper installation will still lead to problems. That's why, alongside product delivery, we consistently provide professional installation guidance and technical support. For customers who have already encountered issues, we also offer free diagnostic assessments and remediation recommendations.
If you're considering SPC flooring or have encountered problems during maintenance, please don't hesitate to contact me and my team. We're more than happy to leverage our professional expertise to help you create a dry, healthy, and beautiful living environment.
- Haining Longtime Industry Co., Ltd
- Sophia Brown | Senior Business Manager
- Professional SPC Flooring Solution Provider